Thursday 31 May 2012

Generate Big Picture Facebook Emoticons Of Your Own

| |
0 comments

Some days ago I posted Big Emoticons For Facebook Chat. There are lot of Facebook Chat Emoticons codes are available on the Internet. Here is a simple online generator to generate a facebook chat codes for your own images. You may generate any images which you cant share with your friends via facebook chat. Here I also Create one... 


[[256329944484796]] [[256329937818130]] [[256329941151463]] [[256329934484797]] [[256329947818129]] [[256330074484783]]
[[256330057818118]] [[256330067818117]] [[256330071151450]] [[256330061151451]] [[256330177818106]] [[256330187818105]]
[[256330191151438]] [[256330181151439]] [[256330184484772]] [[256330291151428]] [[256330284484762]] [[256330294484761]]
[[256330281151429]] [[256330287818095]] [[256330481151409]] [[256330477818076]] [[256330484484742]] [[256330487818075]]
[[256330474484743]] [[256330611151396]] [[256330607818063]] [[256330614484729]] [[256330617818062]] [[256330621151395]] 

How to Generate Facebook Chat Code:

1. First go to this link smileyti.me 

2. Now browse a file
3. Then type the captcha
4. In the last step just ht the "Upload Now" button. 


 That's all Facebook chat codes ready for your images. It make take little bit time. Now just copy the code and paste it your facebook chat window to share with your friends.


Read More

Make Ur Own Extension Of Ur Website For Chrome, Mozilla Firefox,Safari,Internet Explorer

| |
0 comments
WelCome to My Tutorial
In My This Tutorial I will Explain U How To Make Ur Own Extension Of Ur weBsite For Chrome, Mozilla Firefox,Safari,Internet Explorer

Making it easier for your audience to check your site’s content is a smart move. There are various ways in which you can do this, one of them being creating a browser extension for your website. Normally creating an extension involves extensive coding. But with the help of “Builder by Extension Factory” the process becomes much easier.


Steps 1:-Go To The Site :- http://builder.extensionfactory.com/


Step 2:- Add Ur URL On In The Text Field
[Note:-
Builder by Extension Factory is a free web service that lets you create extensions for your browser. Supported browsers include Chrome, Safari, Firefox, and Internet Explorer. All you have to do is open visit Builder with a web browser and enter in your site URL. An extension for your site will then be created and made available as a download. The code will also be provided in case you want to get into the details and modify them.]


Step 3  :- Click On Create My Extension


Step 4:- Copy The Code After Click 


Even if you are not a site owner you can use the website to create an extension for your favorite website. You can then stay in touch with your favorite website through its extension icon.
Features:
  • An extension building tool.
  • Lets you create a browser extension for any website.
  • Supportss Chrome, Safari, Firefox, and Internet Explorer.
  • Can be used by site owners as well as visitors.
  • Shows latest articles in dropdown window through extension icon.


Read More

Wednesday 30 May 2012

ADD CUSTOM ICON TO PENDRIVE

| |
0 comments

Before I Writing this This .. I Try It Many TimeS But I got My Answer I Just Post This For U ... See & Share This  :) :) 

How to change your USB Flash Drive Icon 


1. Go to Notepad (Start --> All Programs --> Accessories --> Notepad).


2. 
Type the following:

Code: 

[Autorun]
icon=youricon.ico
Where youricon.ico is the name of the icon file.


3. Go to File --> Save As --> Name it autorun.inf and save it in the Root of the USB Drive. (For me, it's F:\)


4. Now all you need is an Icon. Icons can be downloaded off the internet but if you have a picture you want to convert into an Icon (.ico),
I use ConvertIco.

5. When you get your Icon, move it to the Root of your USB Drive along with the Autorun file.

6.
 Unplug the drive and plug it back in and you should be able to see your custom icon.
(If unplugging the drive doesn't work, try restarting the computer)


                                 You Can Also See The Video..!!


Read More

Tuesday 29 May 2012

how to post encircled text as a Facebook Status/ Gmail Message/ Twitter Twitt

| |
0 comments
I have one more weekly test to go and I will be completely free to provide you with hacking articles at the end of this month! Till then letz get going with some facebook cool status tricks.In this tutorial you   will know how to post encircled text as a Facebook Status.


  1. Go to here.
  2. Create your bubbled text and copy it.
  3. Now go to Facebook / Twitter / Gmail
  4. Update your status/tweet in an encircled way.


Please drop your comments and share it!


ⒺⓃⒿⓄⓎ ..!!

Read More

Saturday 26 May 2012

How to undelete files on Windows with Undela

| |
0 comments
WelcOme To The Tutorials Of  How To Undelete Files On Windows With Undela
Undela is Ctrl+Z files you've emptied out of the recycle bin. 
(Photo by Hrushi Kshirsagar)


Download a copy of Undela for your Windows computer or laptop. The install process is super quick so you can get started right away.Download It Follow The Steps Below The Information

Chances are that you've deleted a file by accident. Sometimes you're lucky enough to still have it lingering around in your recycle bin, other times you panic after realizing you emptied it three days ago.


Undela is a Windows application that seeks to give you a second chance with your deleted files. Much like a similar app named Recuva, this app will attempt to analyze your free disk space for deleted data and display a result list of its findings. Once you find the file you're seeking in the list, you're just a few steps away from bringing it back to life. Here's how to get started:


Note: This recovery utility can only restore files that are in empty space on your hard drive or removable storage. This means you cannot have overwritten the space previously occupied by the deleted file with new things. This may be the case if you use a utility like CCleaner to overwrite empty space several times when using the cleaning function. If you're unsure about the status of the drive space, give Undela a try anyway.


Step 1: Open the app when the Installer is finished running and choose the drive you'd like to recover files on in the far left-hand pane.
Step 2: Click the Scan button at the top of the app to see a list of files that can be recovered on the far right.
Tip: If you only want to look for certain file types -- say PNG -- you can adjust this setting in Options area. Just go to File > Options and check off the file types you're seeking.
Step 3: Once you've found the file(s) you're looking for, mark the check box(es) to the left of the filename(s) and then click the Restore button.


Also worth mentioning is the file preview that Undela displays when doing its recovery magic. This is handy if you're not sure what the exact file name was of that picture you deleted on accident and don't want to recover everything just to find it. Just select the file name in the list and then press the Preview button (on the right-hand side of the toolbar) to take a look at it.


Step 4: Choose the place on your disk space you'd like to place the recovered file(s).
While serving as a handy tool to fix deletion mistakes, Undela can also help show you just how much information you thought was gone is still hanging around on your computer.


Thank You For Seeing Our This Post...Plz Comment If u Have Any Problem ..!! Once Again Thanx

Read More

Wednesday 23 May 2012

How To Easily unfollow a Facebook post from the new notification box

| |
0 comments
, Facebook gave its notification box a revamped look, as well as a new feature. You can now unfollow a post directly from the notification box.


As you can see above, in the top-right corner of each notification you'll see a small X. When the X is clicked on, you'll be asked to confirm that you do want to unfollow that post. After confirming, the notification will disappear, being replaced with an undo button (should you change your mind). Going forward, you'll no longer receive alerts from the status update you just unsubscribed from.
Read More

Tuesday 22 May 2012

Facebook chat window being used to spread new virus.

| |
0 comments

A new virus is reportedly spreading across computers through the chat window of the social networking giant Facebook
The pop-up window, used for person-to-person chat, pops up with a message from a 'friend', which links to an innnocent looking website.
Clicking on the link immediately infects user's PC with the virus, labelled Steckt.Evl by discoverers Trend Micro, The Daily Mail reports.
The virus instantly disables and removes anti-virus software, then spreads itself by opening chat windows on the Facebook friends of the user.
Security experts Trend Micro, which uncovered the new threat, said the worm propagates via instant messaging applications and social networking sites.
Like many other new Internet threats, the first thing the worm does is disable programs that might detect and destroy it.
According to the report, the purpose is to 'control' the PC, both to steal sensitive information such as bank details and to use the 'zombie' machine as part of a network of attackers in large-scale cyber attacks.
Read More

Friday 18 May 2012

Download SWF File From Website With Ease

| |
0 comments


Here’s how to configure IDM to download swf file from website

  1. Open Internet Download Manager software
  2. Click on “Options” button from the toolbar
    download swf file from website
  3. Now click on “Edit” button located beside “Customize IDM download panels in browsers” text (bottom most button in that panel)
    download flash videos from websites
  4. Now you can add the file formats by clicking on “Add” button
    how to download flash videos from websites
  5. Specify the file format as “SWF” (without quotes)
    download flv videos from websites
  6. That’s it.. Now click on OK button twice
  7. Now restart your browser and navigate to any website which contains flash game or animation (swf content), Now you could see the IDM download button above the swf content which allows you to download the respective swf with a single click.
  8. Finally just choose the destination on your PC to download the swf file and enjoy flash games offline!
Read More

Thursday 17 May 2012

Smooth Scroll jQuery Back To Top Button

| |
0 comments


Remember Always Back Up Your Template Before You Make Changes - 

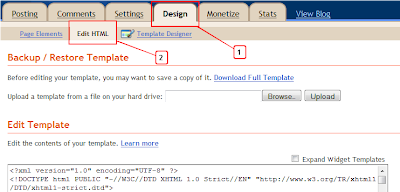
Step 1. In Your Blogger Dashboard Click Design > Edit Html 

Design Edit Html Blogger

Step 2. Find the following piece of code in your blogs Html : (Click Ctrl and F for a search bar to help find the code)

]]></b:skin>

Step 3. Copy and Paste the following code Directly Above / Before ]]></b:skin>


#toTop {
display:none;
text-decoration:none;
position:fixed;
bottom:10px;
right:10px;
overflow:hidden;
width:51px;
height:51px;
border:none;
text-indent:-999px;
background:url(https://blogger.googleusercontent.com/img/b/R29vZ2xl/AVvXsEjW39y9DbFmIFR7vAhBMRm-RTCAjbPgC-WkGesDaBW9URlw755Vsk9if3dhyzLL_z6HcIvRRiAVAwU8CMqtQXMokP2ku_91YhE13GnvqaZI3EBL3UiI9aZgr7bHh7MYTrfJUhpENVks3PY/s1600/ui.totop.png) no-repeat left top;
}
#toTopHover {
background:url(https://blogger.googleusercontent.com/img/b/R29vZ2xl/AVvXsEjW39y9DbFmIFR7vAhBMRm-RTCAjbPgC-WkGesDaBW9URlw755Vsk9if3dhyzLL_z6HcIvRRiAVAwU8CMqtQXMokP2ku_91YhE13GnvqaZI3EBL3UiI9aZgr7bHh7MYTrfJUhpENVks3PY/s1600/ui.totop.png) no-repeat left -51px;
width:51px;
height:51px;
display:block;
overflow:hidden;
float:left;
opacity: 0;
-moz-opacity: 0;
filter:alpha(opacity=0);
}
#toTop:active, #toTop:focus {
outline:none;
}

Note - To move the button to the left of your blog change right:10px; to left:10px; .

Step 4. Find the following piece of code in your blogs Html : (Click Ctrl and F for a search bar to help find the code)

</head>

Step 5. Now Copy And Paste This Code Directly Above / Before </head>

Note - If you have previously added jQuery script to your template you can leave out the line in green.
<script src='http://code.jquery.com/jquery-1.6.1.min.js' type='text/javascript'/>
<script src='http://suyb.googlecode.com/files/jquery.easing.1.3.js' type='text/javascript'/>
<script src='http://suyb.googlecode.com/files/jquery.ui.totop.js' type='text/javascript'/>
<script type='text/javascript'>
$(document).ready(function() {
/*
var defaults = {
containerID: &#39;moccaUItoTop&#39;, // fading element id
containerHoverClass: &#39;moccaUIhover&#39;, // fading element hover class
scrollSpeed: 1200,
easingType: &#39;linear&#39;
};
*/

$().UItoTop({ easingType: &#39;easeOutQuart&#39; });

});
</script>

Step 6. Save your template.


Drop Your Comments And Questions Below.

Read More

How To Make Headline News In Blog

| |
0 comments

As we know, headline news is a feature in TV stations wich usually located at the bottom. Usually, that's display some latest news. But in this case, because it's about blog, so the headline news display the recent posts of your blog. So, the visitors can watch the newest post of your blog. Now, if you want to add it into your blog, just follow the steps below.

1. Log in to your blogger account
2. Go to Design --> Page Elements --> Add Gadget
3. Choose HTML/Java Script
4. Copy the code below, and paste into the place
<script type="text/javascript">
var hn_url_blog = "http://
ctipstricks.blogspot.com";
var hn_jumlah_post = 5;
var hn_warna_latar = "#EEEEEE";
var hn_warna_garis = "#000000";
var hn_posisi = "top";
var hn_tampilkan_judul = true;
var hn_backlink = true;
</script>
<script src=" https://sites.google.com/site/ctiptricks/headlinenews.js?attredirects=0&d=1 ">
</script>
=>Change with your blog address
=>Number of posts that you want to display
5. Save now 
Read More

How to Send Colorful Text in Facebook Chat

| |
0 comments

Facebook has restricted its user to chat in black text due concerns of server overloading and speed. But now you are no longer bound to chat in black text. There are some special codes for you that empower you to send colourful text in chat. This trick is solely based on the fact that when profile ID’s are inserted in between square brackets, it automatically transforms into the profile picture. These ID’s are specially created for this purpose.
You can also send messages in colourful text but these codes will not work in Status update. This will also not work if the other person is using chat from his mobile.

How to Send Colorful Text in Facebook Chat

How to Send Colourful Text in Facebook Chat:

How to Use it:

To create a word of colourful text copy the codes of alphabets and make sure to insert single space between the each alphabetic code. Here is the code for COMPUTER TRICKS.
COMPUTER: [[115602405121532]] [[116564658357124]] [[106596672714242]] [[111669128857397]] [[108983579135532]] [[112669162092780]] [[115430438474268]]  [[106699962703083]]
 TRICKS: [[112669162092780]] [[106699962703083]] [[109294689102123]] [[115602405121532]] [[116651741681944]] [[115927268419031]]

Here is the list of codes with their alphabets.

[[107015582669715]] = A
[ [116067591741123]] = B 


[[115602405121532]] = C
[[112542438763744]] = D
[[115430438474268]] = E
[[109225112442557]] = F
[[111532845537326]] = G
[[111356865552629]] = H
[[109294689102123]] = I
[[126362660720793]] = J
[[116651741681944]] = K
[[115807951764667]] = L
[[106596672714242]] = M
[[108634132504932]] = N
[[116564658357124]] = O
[[111669128857397]] = P
[[107061805996548]] = Q
[[106699962703083]] = R
[[115927268419031]] = S
[[112669162092780]] = T
[[108983579135532]] = U
[[107023745999320]] = V
[[106678406038354]] = W
[[116740548336581]] = X
[[112416755444217]] = Y
Read More

auto post birthday wishes on facebook wall Of Friend

| |
2 comments

Birthdays come and birthdays go.And more often than not we miss wishing our friends. This is especially true of our online network of friends too.One thing you can do is an automated birthday wishes messages on facebook. All these days facebook shows the birthday notice of your friends on your facebook homepage. You need to manually go to their walls and wish them but now this task done by the facebook birthday app. You can send automated birthday wishes.

Auto post Birthday wishes with Autobudder.

Autobudder is an facebook app that helps you to automatically post birthday wishes on the walls of your facebook friends with customized messages from you, at sharp 12, before anyone can. Its hassle free, doubles as a birthday calendar, and at times, just helps maintain those social commitments

How to use AutoBudder ?
  • First log in to your facebook account.
  • Go to http://facebook.com/autobudder
  • Click ‘go to app’ button.
  • Click ‘Allow’ to grant access to the application so that it can collect all the birthday dates of your friends
  • Now in the application, click ‘Set common message!!’
  • You can set custom messages or just allow the default birthday wish message from autobudder.
  • The application displays how the message will appear on wall of your friend.
  • You can also choose to ignore wishing some of your friends by clicking the ignore against your friend’s name.
Now you can set the time zone from the options tab at the top. So that you can set the birthday wish to post exactly at 12 clock. You can enable/disable greeting cards with the birthday message.


Auto post birthday wishes with birthdayFB.

BirthdayFB is a site which helps you to automatically posts birthday wishes on the walls of your Facebook friends. Here's a screenshort from birthdayFB website.


  • First login into your facebook profile.
  • Go to site BirthdayFB and lets connect with facebook.
  • Click allow to grant access the application.
  • Click on the tiny drop down and select Write Message for sending a birthday wish to a selected friend. You can also go into the Write Messages section from the top toolbar to compose your messages.
  • Choose your birthday greetings or write yourself.
  • Go to preferences  and choose your time slot according you.
  • That's all, when the day come your friend automatically received a message

I hope you like this, please leave a comment
Enjoy
Read More